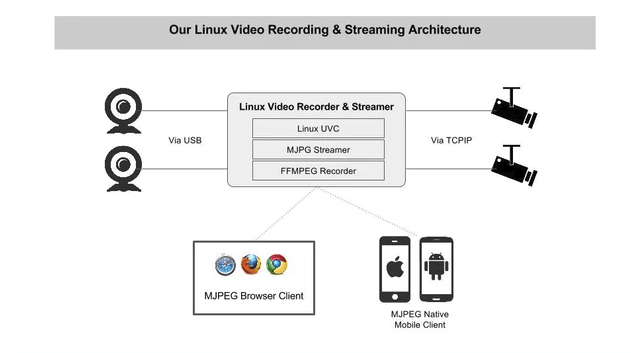
We got a requirement, where the client was looking for a USB camera or IP camera which could stream and record live video from multiple cameras to mobile devices and web browsers. So we, at Tech Vedika, built a complete solution of a Linux-based system with USB and IP Cameras.
We selected MJPEG based Video compression since MJPEG is supported by most of the cameras and client viewers. Motion JPEG or MJPEG is basically a stream of JPEG images transmitted over https protocol. Nowadays it is commonly being used for many multimedia applications, especially in digital cameras, IP cameras, and webcams. The basic advantage of using MJPEG is that it does not require any client software to be installed on the remote computer. To see the streaming video of the MJPEG Streaming server, you need to use any software that supports Motion-JPEG streaming such as Firefox, Chrome, or VLC.
MJPEG based Linux DVR Architecture

MJPEG encoded videos are then sent over the https protocol and shall be watched over the web browsers. It requires a special MIME (Multi-purpose Internet Mail Extension) type, which is “multipart/x-mixed-replace”. After this MIME-header, we need to write “;boundary=<boundary name>” This <boundary name> is chosen by the programmer. The separator pattern used, indicates the client (browser or media player) the beginning and ending of the image block. As long as the client wants to receive new frames and the server is willing to provide those, the TCP connection is kept open.
For this project, MJPG-Streamer was used as the streaming server. MJPG streamer is a command-line application. It copies the JPEG frames from one or more input plugins to multiple output plugins. It was used to stream the JPEG files over the IP-based network from webcams to various types of viewers such as Chrome, Firefox, VLC, and other software capable of receiving JPEG streams.
Since it was originally written for embedded devices with very limited resources in terms of RAM and CPU, it uses very little computing power for compressing the video frames. This helps to reduce the CPU cycles of the server.
MJPEG Streamer Installation
MJPEG-streamer is not in the official repositories and must itself be compiled from the source code.
1.Install dependencies
The following libraries are required to build the MJPG-Streamer.
- build-essential
- Libjpeg8-dev
- Imagemagick
- v4l-utils (optional)
- libv4l-dev (optional)
- checkinstall (optional)
The above can be installed by using the following command.
sudo apt-get install build-essential libjpeg8-dev imagemagick libv4l-dev v4l-utils checkinstall
2. Add missing videodev.h
The “videodev.h” header file that MJPEG-Streamer needs has been replaced with a videodev2.h in latest Linux kernels. To make MJPEG-Streamer happy you have to create a symbolic link.
$ sudo ln -s /usr/include/linux/videodev2.h usr/include/linux/videodev.h
3. Download MJPEG-Streamer
The source code for MJPEG-Streamer is available at sourceforge.net, but it is tricky to find the direct download link.
$ wget //sourceforge.net/code-snapshots/svn/m/mj/mjpg-streamer/code/mjpg-streamer-code-182.zip
Note that sometimes the link above fails to work. If that is the case, you can also download it from your web browser by opening the page.: //sourceforge.net/p/mjpg-streamer/code/HEAD/tarball
4. Unzip the MJPEG-Streamer source code
The source code download is a compressed zip file. Put the file in your home directory (or a temporary folder, if you prefer) and run the following command to extract the files.
$ unzip mjpg-streamer-code-182.zip
5. Build and Install MJPEG-Streamer
MJPG-Streamer comes with several plugins, but only a couple of them are needed to stream video. The command below only builds what’s needed:
$ cd mjpg-streamer-code-182/mjpg-streamer
$ sed -i ‘/PLUGINS += input_raspicam.so/c\#PLUGINS += input_raspicam.so’ Makefile // to disable raspicam as we are building it for a pc
$ make USE_LIBV4L2=true clean all && make install
By this time, you can see the mjpg_streamer in the command line.
Using MJPEG Streamer
1. Check the available video camera
Execute the following command to know the available video cameras.
$ ls -lst /dev/video*
The above command will give something like the below output, it tells us that we have one camera attached.
0 crw-rw—-+ 1 root video 81, 0 May 9 11:31 /dev/video0
2. Start the mjpeg streaming
MJPG streaming can be started by executing below command.
$ mjpg_streamer -i “/usr/local/lib/input_uvc.so -d /dev/video0 -r 1280×720 -f 24” -o “/usr/local/lib/output_http.so -p 8085-w /var/www/mjpg_streamer”
3. Stop the mjpeg streaming
MJPG streaming can be stopped by executing the below command.
$ killall mjpg_streamer
4. Watch the Stream
Now you can connect with your web browser and watch the stream live. If you want to watch from within the same PC, you can enter //localhost:8085 in the browser’s address bar. If you want to watch from another computer in your network use //<IP-address>:8085.
Recording the stream
The stream can be recorded by using ffmpeg command-line tool with the following command.
ffmpeg -i //<IP-address>:8085 <file name>.avi


